The Hidden Superpower of Ableton Live: Simpler(Letto 112 volte)

If you are just starting to produce with Ableton Live or you want to improve your workflow, you will have noticed that the software offers lots of tools. But the truth is that you don't need to know everything right away. There are some devices that, more than others, become reference points in the creative process, tools that you learn to use and that will always come back in your productions.
I'm talking about those devices that help you to shape the sound and give identity to your tracks, without getting lost in a thousand technicalities.
Essential tools
Simpler → Perfect for working with samples in a creative and personalized way.
Drum Rack → To build a custom drum kit and program dynamic grooves.
Operator and Wavetable → To create synthetic sounds without complications.
Audio effects (EQ, compressors, delays, reverbs) → To give character and balance to the mix.
These tools are the basis for creating and developing your tracks, and the beauty is that they integrate with each other in an incredible way.
Let's start with Simpler, which allows you to take any sound and turn it into a playable instrument, giving you full control over rhythm, texture and groove.
Why Start with Simpler?
If you started producing with Ableton Live, you've probably spent hours loop libraries, looking for sounds that fit together well. It's something I've done too: you find an interesting groove, layer it with other drum loops, maybe add some melodic samples... and then what?
Then you realize that the track it has no real direction.
The more you add elements, the more you lose track. It seems to you that the draft is not evolving, so you try to layer even more, to change loops, to fill every possible space. But the result is that the song ends up have too many ideas and no story.
A musical track, just like a good story, needs a beginning, a development and an end. It serves a well-constructed sound narrative, with well-balanced twists and moments of tension.
This is where Simpler comes in.
Unlike the audio loop, which are often inflexible, Simpler gives you full control over your sound: you can modify it, transform it, adapt it to your creative idea instead of letting the sample dictate the direction of the track.
With Simpler, a single sound can become a dynamic element that evolves with the song, rather than a static part that risks weigh down the mix.
The key point?
Instead of rely on loops to fill out your track, learn to sculpt sounds, just like a writer works on words to build a story coherent and engaging.
Now let's see how to best use it in its three main modes.
One-Shot Mode: Percussive Sounds and Creativity in Long Samples
The mode One-Shot Simpler is designed for percussive and short sounds, like a kick, a clap, or a hi-hat. It's perfect for champions who need to play always the same way, without depending on the duration of the MIDI note that activates them.
Think of a live context, Where you don't have to pay too much attention to the duration of the MIDI note, but that's enough for you press a button on the controller to trigger the sample without sudden truncations, e.g. for running vocal chop, risers o transition effects
Exercise: Creating a Custom Kick Without Kick Samples
What if we wanted to create a kick without using a drum sample? No problem! We can transform a bass sound in a kick with Simpler in mode One-Shot.
1️⃣ Upload a bass sample (choose one with few modulations and an almost immediate attack).
2️⃣ Select One-Shot mode and tax Trigger.
3️⃣ Understand the difference between Trigger and Gate:
– Trigger: The sample plays until it ends, regardless of the length of the MIDI note.
– Gate: The sample stops when the MIDI note ends, so you can control its duration directly in the MIDI clip.
– Having chosen Trigger we will set the length of our sample by acting on the end-of-reading markers – if instead we choose to try with Gate, the duration of our Kick will depend on the length of the midi note that triggers it)
4️⃣ Write a MIDI pattern with the notes that will define the rhythmic pattern of the kick.
– By default, the original sample, as you heard it in pre-listening (without pitch variations), is assigned to the Middle C/C3.
NB: If you experience unwanted clicks during playback
Zoom in on the waveform and regulates the start and end reading markers.
Make sure the start/end of the sound coincides with a point where the waveform intersects the horizontal axis (Zero-Crossing point).

⚠️ If the start/end point is in the middle of an ascending or descending curve, you may get an annoying “click”.
Solution: It will be enough move the marker until zero crossing point to eliminate the unwanted effect.

● In these two screenshots we have moved manually the end-of-read marker, but there is also a dedicated button to the automatic identification of the point of Zero-Crossing.
Where is it located? It is positioned at the right of the Trigger/Gate buttons and it's called Snap.
Note how, in the figure below, following its activation, the point of departure is automatically chosen Zero-Crossing, that is, the point where the waveform goes from a yellow color to a gray one.

Add Pitch Modulation for a More Impactful Kick
If you're following these steps, you're probably not entirely satisfied. Are you still hearing a bass sound with a flat, lackluster attack? Don't give up; that's normal when using a bass sample to create a kick drum!
The solution? Modulate the pitch!
A well-built kick is not only a powerful low frequency, but also has a well-defined transientThis principle applies to all percussive sounds.
Steps to Add Pitch Modulation to the Kick
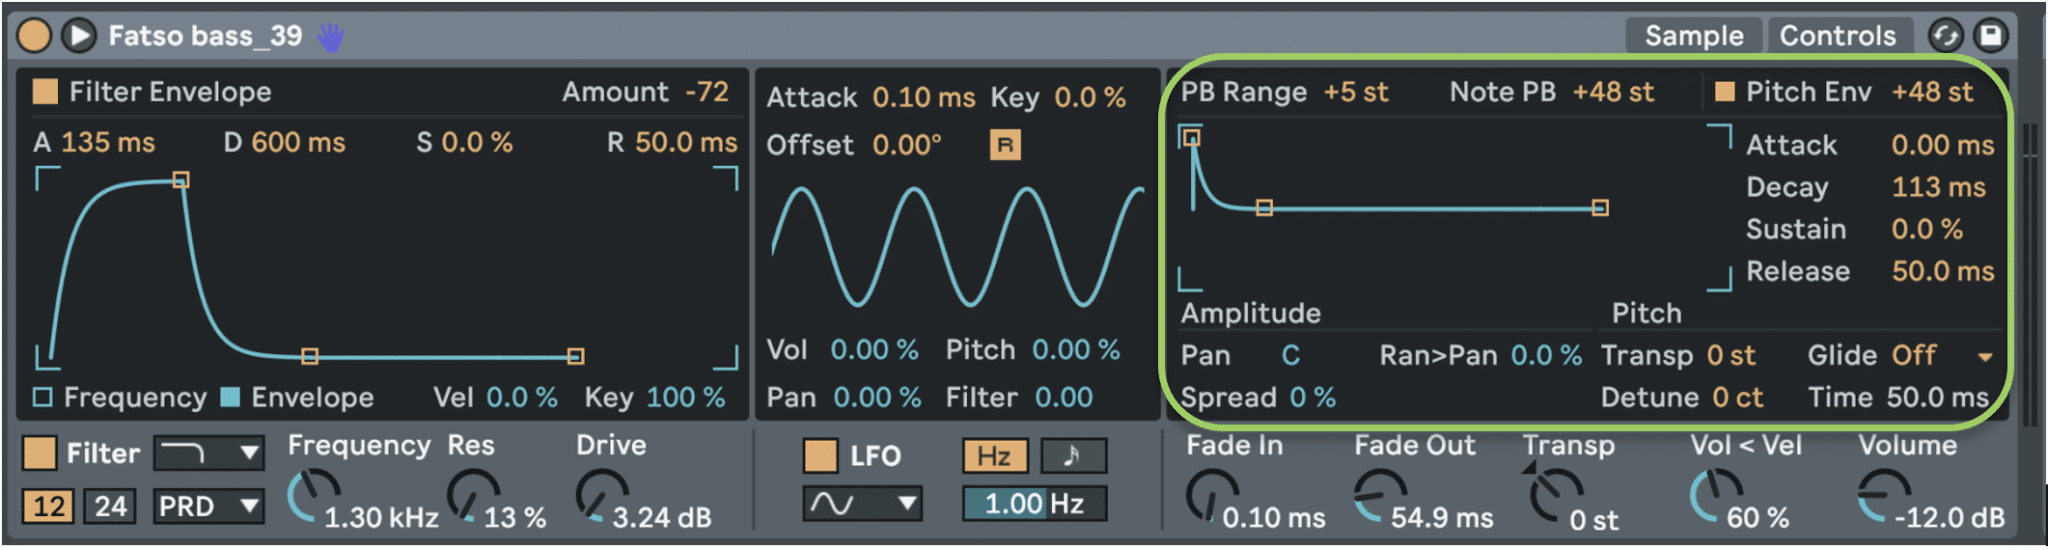
1️⃣ Go to the Controls section of Simpler (by clicking on the tab at the top left).

2️⃣ Activate the Pitch Envelope and increases theAmount at about 24-48 semitones (depends on the desired effect).
This further ADSR envelope manages theincrease or decrease in pitch over time, thus allowing you to control the accelerations and decelerations of the pitch of your sample.
3️⃣ Adjust the Decay to control the speed of the pitch descent.
– In this example I used a value of 113 ms, but the right value varies based on the sample and personal preferences.
– In general, a value between 10-50 ms It's ideal for a techno speaker.
4️⃣ Listen to the result: you will notice that the kick has a much more defined attack and more impact in the mix.
Why does this work?
✔️ An initial transient higher in frequency It helps the kick cut through the mix better, especially on playback systems with less bass (such as cheap headphones or laptops).
✔️ The rapid descent of the pitch simulates the natural behavior of a analog speaker or of a classic drum machine.
In fact, if you look at the waveform of a kick, in most cases you will notice that:
– The initial part of the wave is more high frequency (green zone), with very close oscillations.
– Next, the wave gets longer, lowering in frequency (red zone) , creating the classic deep body of the case.
![]()
Trick
If you want a even more aggressive attack, try to push the Pitch Envelope until 72 semitones, but reduce the Decay under 20 ms to avoid an unnatural effect.
Filtering Phase: Cleaning or Coloring the Kick
Now that we have a kick with a well-defined transient, we need to eliminate unnecessary frequencies and give it more character.
1️⃣ Activate the Simpler filter and choose one Low-Pass o High Pass, depending on the result you want to achieve.
Low-Pass vs High-Pass: Which Should You Choose?
Low-Pass: useful for eliminating unwanted high-end noise and making the kick sound rounder.
High-Pass: if the kick is too heavy on the lows and you want to avoid it “clogging up” the mix.
Adjust the Cutoff
2️⃣ Adjust the Cutoff:
– If the kick sounds too loud or dirty, turn down the Low-Pass around 10-12kHz(In the example, it was necessary to go down to 1.30 kHz because the Bass sample carries higher mid-high frequencies than a classic Kick sample.)
– If the kick is too bulky in the sub-frequencies, try cut below 30Hz with a High-Pass.
Emphasizing the Body of the Kick with Resonance
3️⃣ Use Resonance to emphasize the body of the sound:
– A light value (between 0.5 and 10) helps to strengthen the frequencies around 100-200Hz, where the kick has its “punch”.

Filter Dynamically with the Filter Envelope
Please note: in my setting you will notice that the filter is not applied statically, but its action is dynamically regulated by thefrequency envelope – Filter Envelope.
The concept behind this choice is to filter the sample towards the low frequencies only after thepitch envelope completed its task, thus giving me a nice transient.
If you remember, in the Pitch envelope I had chosen a Decay time of 113 ms. Only after a few milliseconds my filter envelope will come into play, with a Attack value of 135 ms, going to “darken” the sample.
In fact, the filter will close towards the low frequencies, being related to the Filter Envelope with negative value of Amount equal to -72(To be clear: with a positive Amount value we would have achieved an opening of the filter towards the high frequencies, starting from our cutoff value, i.e. 1.30 kHz)
Extra Tricks: Choosing the Right Filter in Simpler
Ableton Live offers four types of analog-emulated filters in Simpler, each with a unique sonic character. In my case, as shown in the previous image, I decided to use the Low-Pass PRD for a harmonic enrichment and to give more hardness and density to my Kick.
Choosing the right filter It can radically change the tone of your kick or any other sound.
PRD (Moog Prodigy Emulation)
Characteristics:
– He adds harmonic saturation and analog coloring.
– With high resonance, it can self-oscillate, generating a brighter sound.
Ideal for:
– Aggressive, vintage kicks with analog warmth.
– Full-bodied and enveloping basslines.
– Sounds that must have presence and character.
OSR (OSCar Synth Filter Emulation)
Characteristics:
- More soft and musical compared to the PRD, with more controlled saturation.
– It maintains a warm, but less aggressive sound.
Ideal for:
– Vocal chops and melodic samples.
– Smooth synths and atmospheric pads.
– Percussive sounds with a rounder, less dirty character.
MS2 (Korg MS-20 Emulation)
Characteristics:
– Dirtier and more aggressive filter, famous for its acid and distorted character.
– The resonance has a very pronounced curve, creating a distinctive sound.
Ideal for:
– Distorted and brutal kicks, perfect for industrial and hard techno genres.
– Acid bassline and aggressive sounds.
– Experimental effects and unique sound textures.
SMP (Sallen-Key Emulation – Vintage Sampler)
Characteristics:
– The most neutral and clean among analog filters, with minimal saturation.
– Perfect if you want to filter without coloring the sound.
Ideal for:
– Drums and percussion where you just want to clean up the sound.
– Orchestral instruments and cinematic samples.
– Situations where you don’t want to add distortion or saturation.
Why is the filter important?
– Allows you to clean up the sound, preventing the kick from colliding with the bassline.
– It helps to bring out only the useful frequencies, improving the overall clarity of the mix.
– Can you add a light saturation and harmonic distortion, making the kick richer.
– With high resonance, generate analog coloring and a slightly “self-oscillating” effect.
– It can make the sound dirty in a musical way, perfect for techno and dark electronic genres.
Conclusion: From One-Shot to the Discovery of Simpler
We have seen how the mode One-Shot Simpler is a powerful tool for working with percussive and non-percussive sounds, transforming them into functional and customized rhythmic elements.
Through the pitch modulation and the strategic filtering, we managed to create a powerful and defined kick without depending on pre-packaged sample packs.
In the next article we will see:
✅ Classic Mode – To play a sample like a synth, with looping and full ADSR envelope.
✅ Slice Mode – For splitting a loop and playing it creatively, ideal for organic grooves and deconstructed rhythms.
If you're ready to push your creativity even further, I'll see you in the next article, where we'll discover how to transform a simple sample into a dynamic and fully customizable instrument.
Be Advanced.
Leave a Reply
Want to join the discussion?Feel free to contribute!