Gain Staging Today: Myth, Practice and Reality(Letto 110 volte)
A brief history: from the analogue era to the digital transition
In the early days of audio recording, in the 1920s and 1930s, when acoustic horns and wax cylinders were used, the concept of ’level’ was virtually non-existent: controlling the intensity relied on the distance and orientation of the sound source in relation to the recording device. With the advent of the first valve amplifiers and magnetic tape recording after the Second World War, the need arose to adjust the input gain in order to achieve a good balance between background noise and harmonic distortion. Analogue mixing consoles were calibrated to a “Standard Operating Level”, for example +4 dBu for professional broadcasting or -10 dBV for consumer electronics, so as to ensure headroom for the most energetic transients and leave room for the natural compression of the tape.
In the 1970s and 1980s, the first digital recording and playback systems appeared, such as Soundstream, Fairlight and Synclavier, in which 0 dBFS immediately signalled clipping without any soft saturation curve. This gave rise to the practice of keeping the working level well below 0 dBFS, in order to preserve headroom and signal-to-noise ratio even after processing. With the explosion of commercial DAWs in the early 1990s, gain staging became established as an essential discipline: 0 analogue VU was conventionally mapped to -18 dBFS digital, thus ensuring an optimal baseline for inserts, bussing and subsequent processing.
Today, even though we have access to converters and plugins of the very highest quality, the principle remains the same: each stage of the signal chain must operate within its own sweet spot to maximise the signal-to-noise ratio and avoid unwanted clipping. We’ve talked about gain staging, as well as dBFS, SOL and dBV: so let’s take a look at the table below for a mini glossary to get you off to a good start.
Mini glossary

Definition of Gain Staging
Gain staging is the process of adjusting gain levels along the signal chain, so that each stage operates within an optimal range: neither too low, with the risk of accumulating noise and losing perceived resolution, nor too high, with the risk of saturation or clipping. In other words, it means controlling how much signal enters a device and how much comes out before sending it to the next stage, whilst always maintaining a consistent balance between level, headroom and sound quality.
Let’s suppose we have a signal coming from a microphone: simply adjusting how much of that signal enters the mixer channel is already part of gain staging. If that signal then passes through a preamp, a tape emulator, a compressor and finally an EQ, at each of these stages we need to assess how much level we are feeding in and how much is coming out, before feeding it to the next device. This approach is not just about controlling the volume, but about managing the entire signal path, from the source right through to the master bus.
Put simply, gain staging is the practice of managing signal levels correctly from the moment they enter the system until they reach the master bus, even before you start mixing. The technique is applied in both the analogue domain, where it serves to optimise the response of the hardware, both in the digital realm, where this is essential to prevent clipping and to ensure that plugins emulating analogue equipment function correctly. Furthermore, in Ableton Live, the 32-bit floating-point audio engine offers ample internal headroom, but the signal must still be kept under control when it reaches the final output or when it encounters level-sensitive processors.
This is why gain staging remains essential: despite the differences between the analogue and digital worlds, the basic principle is the same, namely managing signal levels to achieve a clean, balanced and predictable sound. In the analogue workflow, the main problem is to keep each piece of kit within its ideal operating range and make the most of harmonic saturation without compromising the signal-to-noise ratio; in the digital workflow, however, the focus shifts to preventing clipping and ensuring that plugins – particularly analogue-modelled ones – behave correctly. In this article, we will therefore look at how to apply gain staging in Ableton Live, distinguishing between analogue and digital dB and comparing ‘out-of-the-box’ and ‘in-the-box’ workflows.
Analogue method: out of the box
Before the advent of digital technology, gain staging was essential for very practical reasons. Analogue equipment had very specific inherent limitations and characteristics: background noise, progressive saturation, non-linear response and the need for calibration between different devices. The aim was to keep each piece of equipment within its ideal operating range, minimising unwanted noise and, within certain limits, making the most of the tonal qualities of harmonic saturation.
Digital method: in-the-box
In the digital world, however, signals have a clear limit defined by 0 dBFS, beyond which abrupt and unpleasant digital clipping occurs. For this reason, even though there is less concern about background noise these days, it remains essential to leave a margin – that is, headroom – to avoid unwanted distortion and to ensure that plugins emulating analogue equipment can be used correctly. In practice, the average level is often kept at comfortable reference values, so that subsequent processors can operate without being pushed beyond their ideal operating range.
A useful approach is to view gain staging not as a rigid rule, but as a method of controlling the behaviour of the signal chain. In Live, the fact that the internal audio engine has enormous headroom does not eliminate the need for good balance: it simply shifts the issue from “never exceeding” to “knowing where and why I am raising or lowering the signal”. This is what makes the technique still relevant in modern mixing, especially when using saturators, compressors, tape plugins and other analogue-modelled processors.

Analogue dB vs Digital dB
A key technical point to clarify is the difference between analogue and digital scales. In the analogue world, we work with operational references such as VU, dBu and dBV, which do not represent an absolute limit but rather a working value around which the audio chain is organised. In the digital world, on the other hand, the reference is dBFS, that is to say Full-scale decibels, and here the 0 represents the upper limit beyond which digital clipping occurs.
In In the analogue domain, the signal behaviour is more gradual: once certain levels are exceeded, the machine does not “cut out” abruptly, but begins to saturate gradually. This saturation can introduce harmonic distortion, which is often perceived as pleasant or musical, particularly when seeking character and tonal density. In practice, the analogue working range is not defined by a clear-cut limit, but by an operational range within which the sound can be pushed with a certain degree of flexibility.
In the digital world, however, the behaviour is much more rigid: when the signal reaches 0 dBFS, the system has no headroom left and any signal exceeding this level results in clipping. Here, there is no smooth transition as there is in analogue systems, but rather an abrupt shift from correct reproduction to distortion. For this reason, in Ableton Live, the critical point is not simply the fact that a signal “goes into the red” within the DAW, but the moment where it is sent out of the software, for example via the master out or during export.
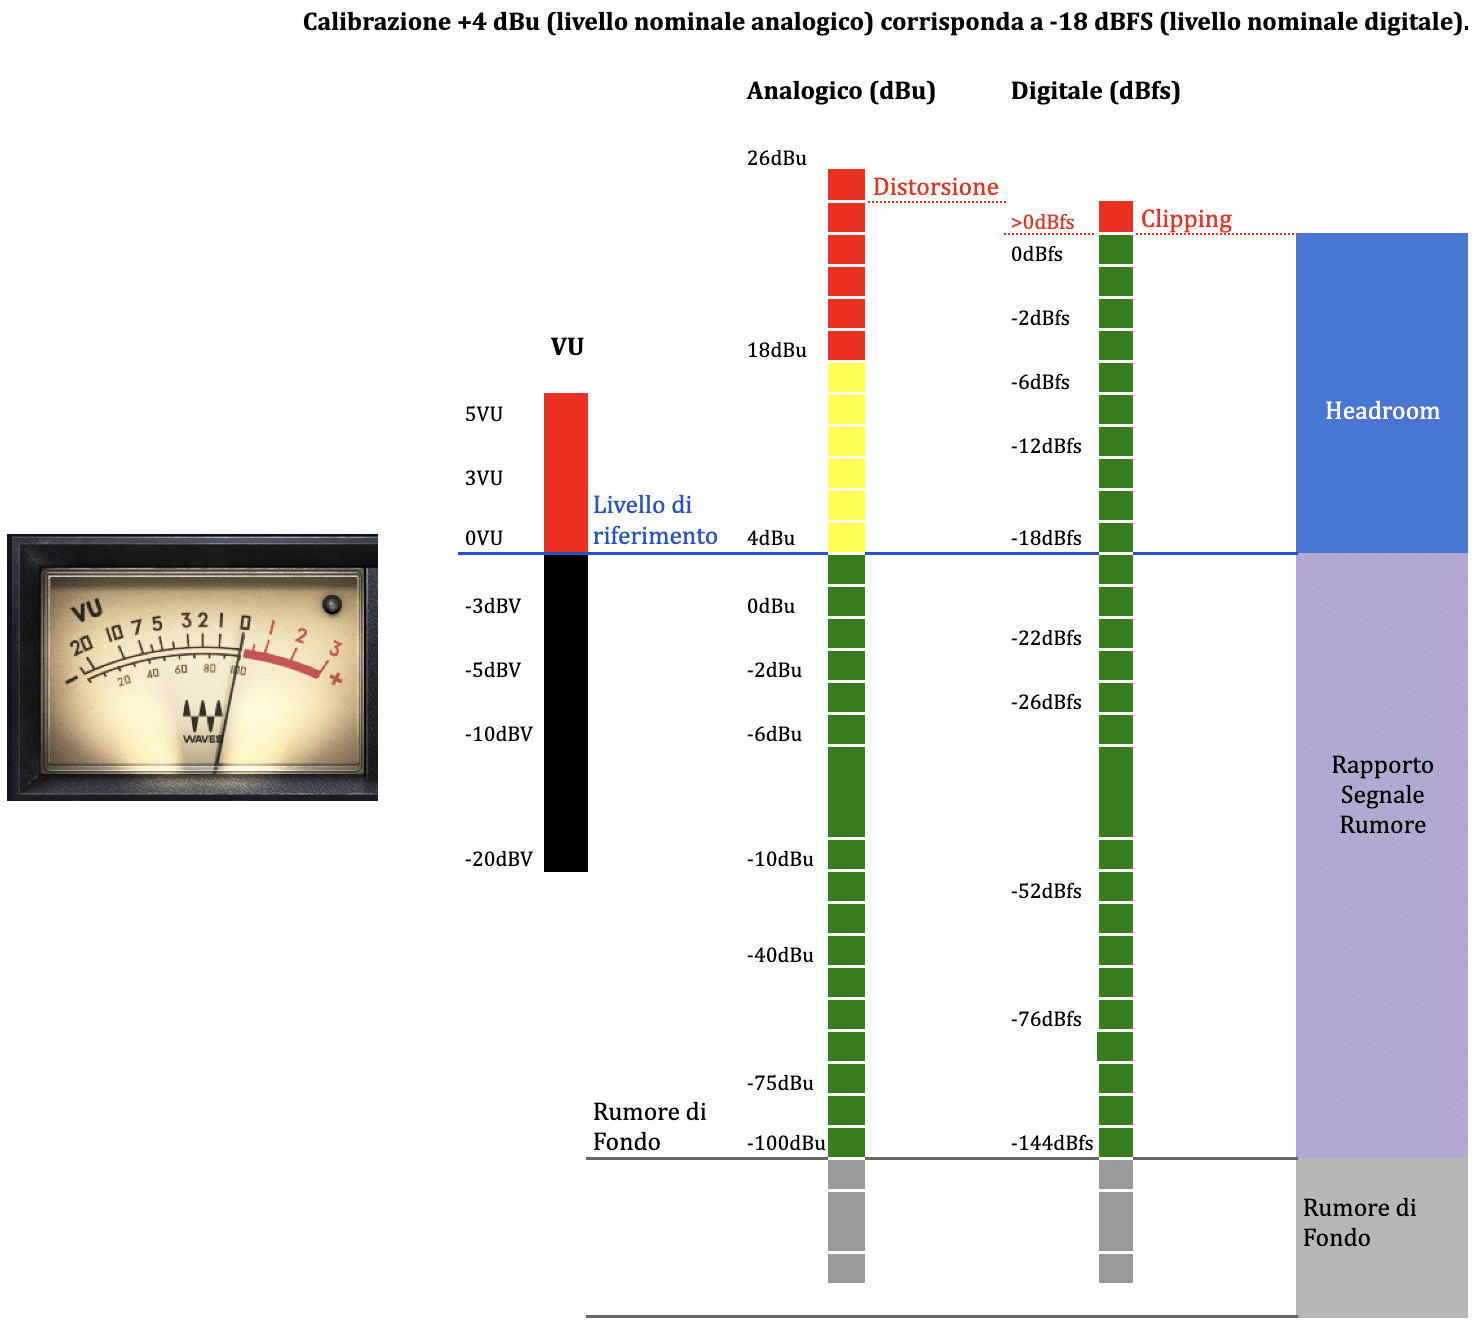
Below, you can therefore see an example comparing the 24-bit dBFS scale with the dBu scale, highlighting how 0 VU – often associated with +4 dBu in a professional context – is commonly mapped to around -18 dBFS in the digital domain. This reference is useful because it provides a practical basis for working with plugins, buses and hybrid processing chains, whilst maintaining sufficient headroom for transients and subsequent processing.
Reference table
So Gain staging isn’t about setting a magic number, but about ensuring each stage operates within the most appropriate range. In modern mixing, particularly in Ableton Live, The real aim is to know when you are dealing with an “operational” level and when, on the other hand, you are already moving into a creative or critical analysis of the signal.
Peak and RMS: how is an audio signal measured?
Alongside the reference scale, it is also important to understand how a signal is measured. In the analogue domain, VU meters respond slowly and indicate the average signal level, which is fairly close to the concept of digital RMS; in digital systems, however, peak and RMS measurements coexist, each serving a different purpose. In Ableton Live, the channel meter displays both the peak and RMS levels: the peak reacts to sudden changes, whilst the RMS provides a more stable indication of perceived loudness.
Peak measurement is useful for monitoring transients and preventing clipping, as it captures the instantaneous maximum point of the signal. RMS, on the other hand, better describes the signal’s average behaviour over time and therefore more closely reflects how we perceive volume when listening in real life. Ableton itself distinguishes between these two behaviours: in the channel meter, the peak responds to sudden changes, whilst the RMS represents the average output or input level, depending on the monitoring mode.

In practice, this distinction is very useful. If a signal has a very high peak but a relatively low RMS value, it may sound “loud” for just a few moments without actually having much energy over time; if, on the other hand, the RMS is high, the signal tends to be perceived as fuller and more present. This is why, when managing gain staging, the peak value is used to prevent the limit from being exceeded, whilst the RMS helps us to determine whether we are operating within a balanced and musical range.
A brief operational clarification
The peak tells you how close you are to the limit; the RMS tells you how much the signal “fills” the space over time. In this sense, the peak is more closely related to technical safety, whilst the RMS is more closely related to the musical perception of the level.
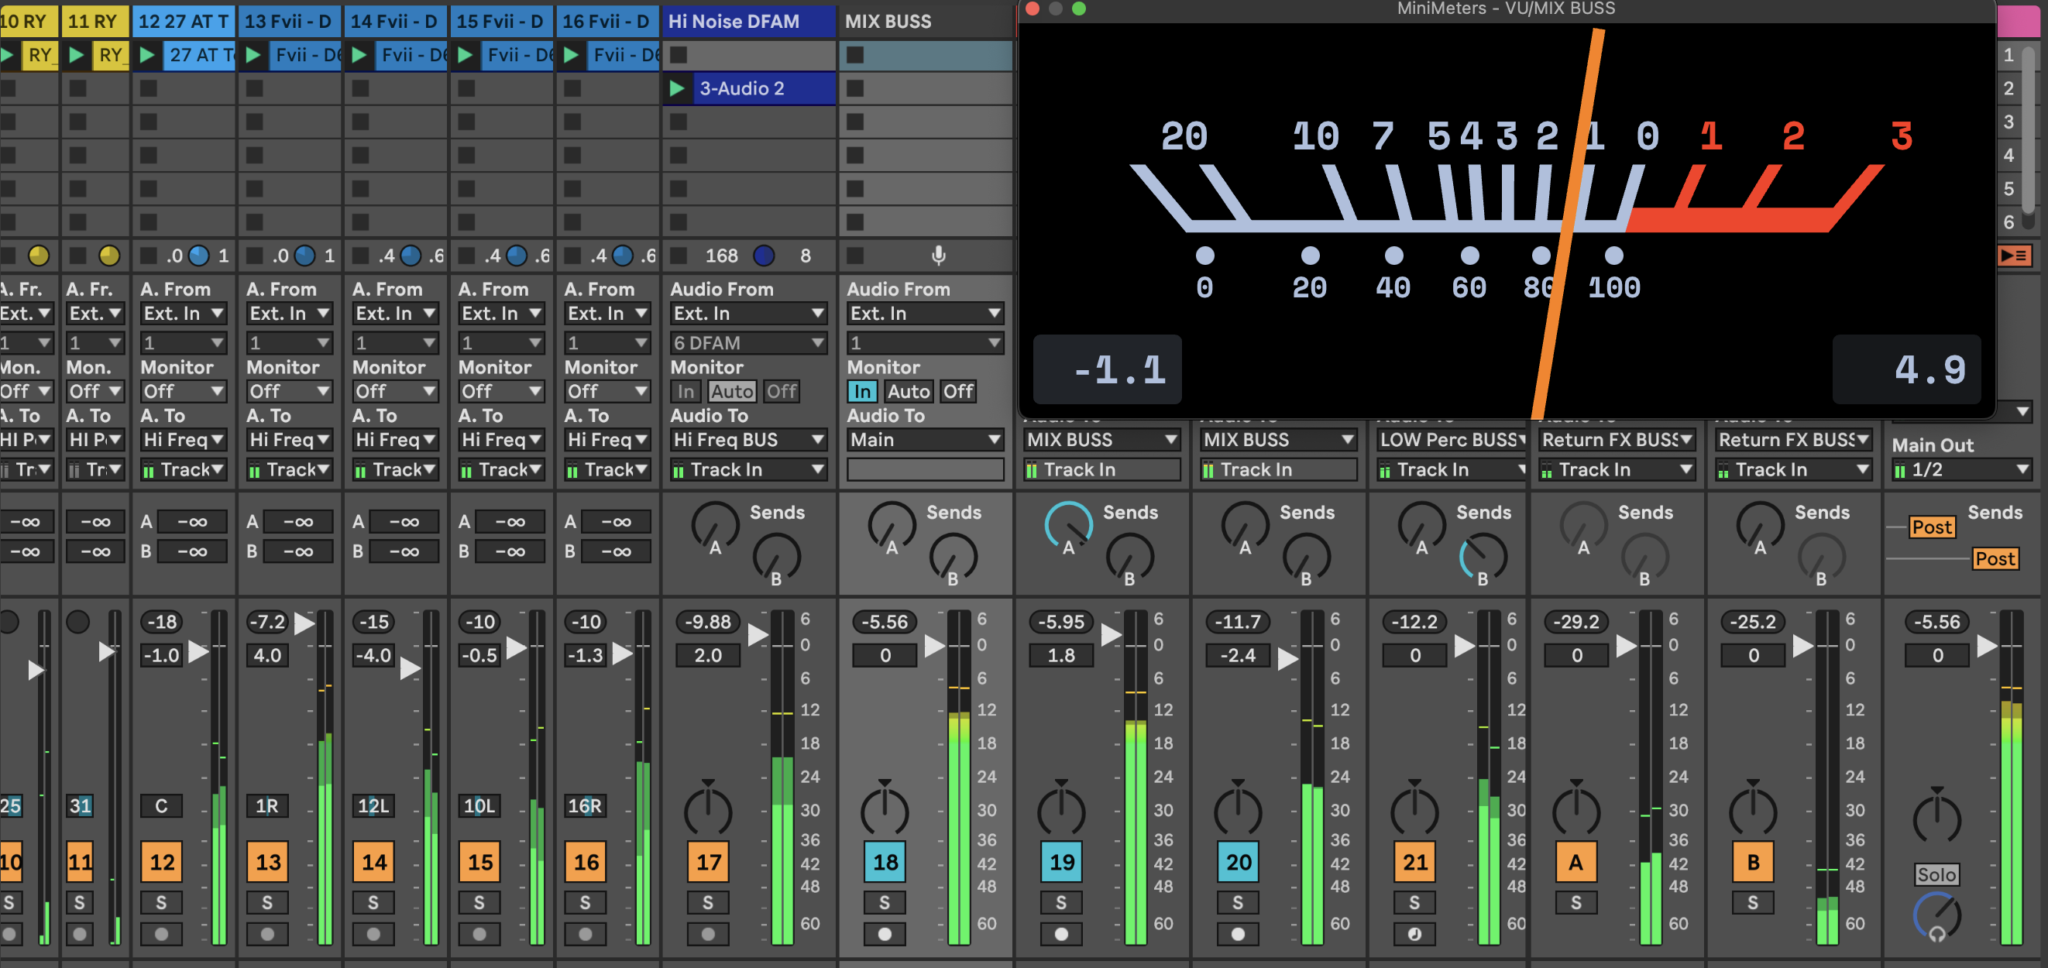
In Ableton Live, we have an accurate representation of the signal level which indicates, for example in red, whether we are in a zone where “clipping” is likely, whilst the yellow-orange area above -18 dBFS can safely be referred to as “headroom”, but we’ll come back to that shortly. Furthermore, as can be seen from the image below on track number 2, the meter shows us with a The RMS signal is shown in a brighter shade of green, whilst the peak level is shown in a darker shade of green.

In practice:
A signal may have high peaks but a low RMS value, such as a drum with sharp transients.
Or have a high RMS but low peaks, like a compressed pad.
This distinction is crucial during gain staging: in digital systems, we generally work at −18 dBFS RMS, which corresponds to +4 dBu in analogue terms, or 0 VU. This is the level that ensures the best headroom for subsequent processes such as compression, saturation and limiting.
What exactly is headroom?
In analogue audio, the typical nominal level for a professional system is +4 dBu, which corresponds to 0 VU on traditional meters. Any signal exceeding +4 dBu begins to approach the circuit’s saturation point: the remaining headroom is the margin between the nominal level and the point at which the system no longer faithfully reproduces the signal.
In digital audio, the nominal level is generally set at −18 dBFS, whilst 0 dBFS is the point beyond which the signal is abruptly clipped. Consequently, headroom in digital audio is the difference between −18 dBFS and 0 dBFS; that is, the margin that ensures the strongest transients do not cause sudden distortion and leaves room for subsequent processing.
Headroom is therefore the margin, measured in decibels, between a signal’s nominal operating level and the maximum level that a given system is capable of handling before entering saturation or clipping. In the context of gain staging, monitoring headroom means setting levels so that the peak value remains sufficiently below the saturation threshold.
Let’s finally look at an example of how to handle an input signal in Ableton Live.
Practical examples and tips
Let’s look at some practical examples to put these concepts into practice: managing a signal – in this first example, an electric guitar – which clearly has an input peak level that is too high (1.22 dBFS), whilst the RMS component stands at a good -12 dBFS. In this case, as -18 dBFS RMS is our reference point, we simply need to At the start of the chain, place a Utility instance and reduce the Gain by -6 dB.

Conversely, if the signal is too low, with an RMS level below -24 dBFS, the solution is just as simple: increase the Utility’s gain by +3 or +6 dB until the target of -18 dBFS RMS is reached. The important thing is always to maintain a safety margin relative to the maximum peak, with at least 6 dB to spare before clipping at 0 dBFS, thereby avoiding clipping during subsequent processing.

Let’s see how the signal is attenuated after inserting the Utility and subtracting -6 dB: we obtain a peak level sufficiently far from 0 dBFS, at -7.46 dBFS, whilst the RMS signal sits just above -18 dBFS.
Different approaches for different purposes
Moving on to some practical examples, it is impossible not to consider the management of levels on the Drum Bus. The approach changes significantly depending on whether you’re working with a fully “in-the-box” mix or a hybrid chain featuring a ‘colourful’ compressor such as an SSL or an SSL plugin emulation. In Live, Group Tracks are designed precisely to sum and process a set of sources in a natural way, so the drum bus can become the centre for controlling the group’s dynamics and tone.
Example in the box
If you work entirely digitally and don’t use emulation plugins, the drum bus can be managed much more freely. In this case, gain staging isn’t about chasing a “correct” level as a matter of principle, but simply about avoiding getting too close to the output limit and maintaining a clear mix between the kick, snare, hi-hat and overheads/samples. You can therefore choose to leave the individual tracks at comfortable levels, balance the bus using the group fader, and use a compressor only if you need dynamic control – not because the digital system necessarily requires a predefined level.
With this type of bus, the main aim is to ensure consistency in the groove and the overall sound, not to simulate an analogue chain. If the Drum Bus does not contain any non-linear processors, increasing or decreasing the level does not substantially alter the sound character: what changes most is the perceived balance, the headroom on the master, and the way transients approach zero dBFS. In practice, the bus is used more as a control point than as a saturation point.
Hybrid example
If, on the other hand, you insert an SSL bus compressor or a plugin emulation of it into the Drum Bus, it’s a different story. Here, the input level becomes part of the sound, because the compressor’s response, the amount of gain reduction and the perceived punch depend directly on how hard you “push” the signal into the unit or the plugin. In this scenario, gain staging comes in handy not as a rule to be followed blindly, but as a tool to make the compressor work at its most musical.
For example, if you send a drum group into a bus compressor at too low a level, you might end up with almost imperceptible compression and a rather lacklustre effect. If, on the other hand, you send it in too loud, you may over-compress the transients, muddy up the attack of the kick and snare, and lose definition. Here, the level becomes a genuine aesthetic choice: you’re not just turning the volume up or down; you’re deciding how much the compressor should alter the character of the drums.
Practical workflow
Here’s a useful approach: keep the signal tidy in the digital drum bus, leave some headroom on the master, and use the group fader for the overall balance; in the hybrid Drum Bus, on the other hand, first adjust the level going into the compressor and then correct the output after compression, so that you can truly compare the “before and after” without being misled by the perceived volume. In Ableton Live, group routing is neutral, so the sound doesn’t change simply because you’re routing it through a Group Track: it changes depending on what you put into it and how you’re controlling it.
In summary, in a fully ‘in-the-box’ mix, gain staging on the drum bus is primarily a matter of order, headroom and clarity; in a hybrid mix using SSL-style compressors, however, gain staging becomes an integral part of sound shaping and should therefore be approached with greater deliberation.
When gain staging really is needed.
In the world of mixing, gain staging is often presented as an absolute rule. In reality, based on my own experience, I can certainly say that In a fully digital environment, this is not a mandatory practice to preserve sound quality: In practice, the 32-bit floating-point audio engine offers a huge headroom, and signals can go well beyond 0 dB without internal clipping; the real problem arises when the signal leaves the software and enters the outside world – that is, via the main output, a physical interface or export – where exceeding 0 dB becomes critical. This means that the real focus should not be on the myth of the “perfect” level at every point in the chain, but on managing the signal intelligently depending on what you’re doing.
To put it simply: in digital audio, gain staging isn’t always necessary to prevent sound degradation, But it’s still useful when the level affects a processor’s behaviour, when you need to check the headroom of the mix, or when you’re working with signals going in or out of converters, external hardware or exported files. In other words, if a plug-in, an analogue emulator, a compressor, a saturator or an EQ reacts differently depending on the input level, then gain staging becomes both a creative and a technical choice, because it directly influences the sound.
There are therefore situations in which you should use it with great care. The first is the recording: When recording, it’s best to avoid unnecessarily high levels, especially if you’re using analogue-to-digital converters or if you want to leave some headroom for transients. The second is the use of non-linear plug-ins, because many processors emulate analogue behaviour and alter the tone, compression and harmonics depending on how hard you “push” them. The third is the mix bus and group management: if you add up a lot of elements, keeping things organised across tracks, buses and the master helps ensure you don’t get too close to the limit when the signal leaves Live or is exported.
However, there are also situations where you can almost do without it. If you’re working entirely ‘in-the-box’, using virtual instruments and linear or gain-compensated plug-ins, and if your workflow is already under control in terms of routing and final output, you don’t need to apply a rigid gain-staging routine to every track just for the sake of it. With this approach, the musical balance of the mix, the relationship between the volumes and the coherence of the listening experience are more important than rigid adherence to a specific figure in each channel.
Conclusions
The key distinction, therefore, is not between using gain staging and not using it, but between an analogue approach – where the level is part of the sound’s character – and a digital approach, where the level is often a tool for control and workflow organisation. In a modern mix created entirely within a DAW, Gain staging really comes into its own when you want to control how your processors behave, preserve headroom on the master and keep the signal clear; however, it becomes much less essential if your aim is simply to avoid internal clipping and you are already working with a well-organised workflow.
I hope I’ve shed some light on a very hot topic; obviously, much of what I’ve outlined is the result of the experience I’ve gained over the years, tailored to my own way of working with audio. After all, every mix always reveals something about the person creating it: the rules they follow, how they listen, the mistakes they make, the corrections they apply, and that practical sensitivity that only comes with time.

Danilo Rispoli — Ableton Certified Trainer since 2010, producer, sound engineer and sound designer.
For over 15 years, I’ve been helping producers, DJs and musicians turn their ideas into productions that sound exactly as they should: vibrant, powerful and full of personality.
I believe that sound should be experienced and explored, not just learnt; that’s why I share practical methods, effective approaches and targeted techniques, revealing tips, pitfalls and shortcuts that no manual will ever tell you about – whether online or in person.
If you want to improve your workflow, pay attention to every detail of your productions and gain a deep understanding of the structure of sound, make your choice: Be Advanced!
Ableton Live – Certified Trainers
Superproof
Linkedin
Social
Instagram
SoundCloud
Facebook
https://linktr.ee/danilorispoli
Leave a Reply
Want to join the discussion?Feel free to contribute!