
Ableton Effect Rack: Matryoshka-style structures combining clinical precision and unbridled creativity(Letto 102 volte)

If you think Ableton Live is just a sophisticated DAW designed for live performance, it’s time to rethink your assumptions. Hidden away in the menus, seemingly innocuous, is a feature that transforms your laptop into a professional studio console: the Effect Rack. It’s not simply a way to organise effects – it’s the crucible where technology meets creativity, where a single fader can simultaneously control ten different parameters, and where macros become your best allies in the chaos of a late-night mix. In this article, you’ll discover how to build Effect Racks that not only streamline your workflow but also open up a universe of creative possibilities you may not even have known existed. Get ready to completely rethink your approach to music production in Ableton.
Effect Racks: what they are and why you can’t do without them
An Effect Rack is, essentially, a smart box into which you can slot effects, organise them into parallel or serial chains, and control them all using a few simple controls called macro. But it’s not just that: it’s the chance to create customised tools, to save complex configurations as reusable presets, and to tame the sonic chaos of your track with surgical precision or creative anarchy, depending on what you need.
Macros are the beating heart of it all. Imagine wanting to control the drive of a saturator, the feedback of a delay and the cutoff of a filter all at the same time – all with a single fader. That’s what macros do: they map multiple parameters to a single control. And if that weren’t enough, you can randomise these parameters (whilst excluding any you want to keep fixed), create Macro Variations to switch between different states with a single click, and even create “matryoshka” structures where each Rack contains other Racks, allowing for an almost infinite hierarchical organisation.
In the following sections, I’ll show you how to build two completely different Effect Racks: a classic Channel Strip designed for precision mixing, and a second one for creating Techno-oriented harmonic resonances, perfect for those who aren’t afraid to get their sound a bit dirty in the pursuit of something truly new.
Structure diagram of the Channel Strip

The Channel Strip is organised like a three-tiered matryoshka doll: the Channel Strip Master (left) contains all the total control, the Control Rack (centre) displays the most commonly used controls during mixing, colour-coded (Dry in yellow, Compressor in light blue, Overdrive in magenta), and the Parallel Rack (right) shows the three actual parallel chains with reverb applied to the sum. The arrows link the macros to their corresponding parameters.
Example 1: The Universal Channel Strip
Analysis of the top row of macros: the basis of the Channel Strip
The Channel Strip has a classic look, but if you look closely at its top row of controls, you’ll immediately notice its focus on a more modern and flexible approach, designed to suit today’s workflows. Let’s take a closer look, control by control:
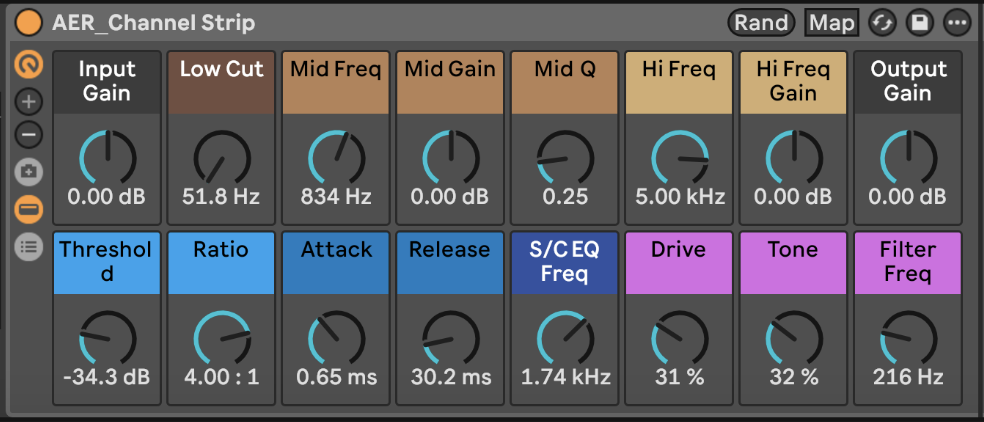
Input Gain: this macro allows you to quickly increase or decrease the track’s input level, an essential function when the initial volumes vary greatly or you need to optimise gain staging right from the very first bars.
Low Cut: there’s something really clever hidden here. Two parameters of the EQ Three are mapped to this macro: the low-frequency filter’s On/Off switch and the crossover frequency control. The mapping has been designed to make the process quick and easy: as you turn the macro, the low-pass filter is activated (muted) as soon as the value exceeds 50 Hz. To achieve this behaviour, simply adjust the settings in the “Map” window of the Effect Rack: here you’ll find the EQ Three – LowOn parameter, where you set Min=127 and Max=1 (i.e. you invert the macro’s behaviour). This way, at values other than 1, the filter will “mute” the bass. The rest of the macro’s travel range gives you continuous control over the cut-off frequency, with no interruption between the filter being off and it engaging.
Mid Freq, Mid Gain, Mid Q: these three parametric macros are designed to provide fully integrated control over the mid-frequencies. You can freely select the centre frequency (“Mid Freq”), set how much you want to boost or cut it (“Mid Gain”) and adjust the filter’s Q (“Mid Q”). The decision not to restrict them to a narrow range allows you to surgically cut or emphasise frequencies from the deepest bass to the highest treble, adapting the band to any source and mixing style.
High-Frequency Gain: Here you’ll find a “hi-shelf” filter for the high frequencies, ideal for restoring any brilliance that may have been lost in previous stages, or simply for quickly shaping the sound’s presence.
Output Gain: The EQ section’s output level control rounds off the chain; it’s perfect for rebalancing any excessive boosts applied in the previous steps and restoring the track to a consistent volume level.
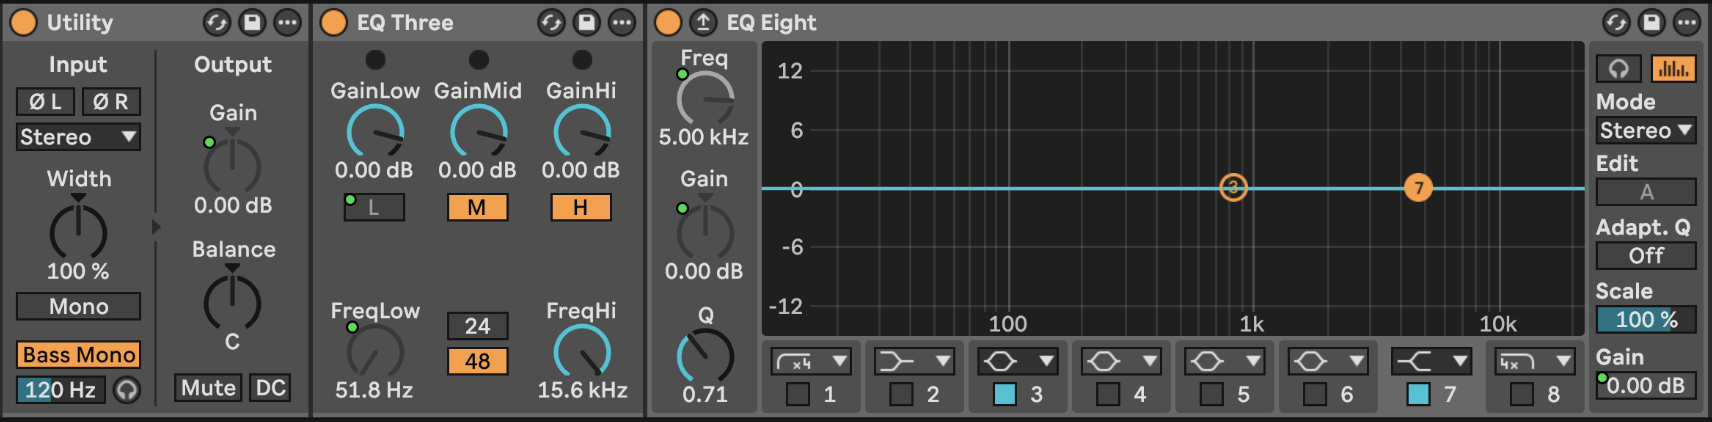
The Utility, used for input gain and to route frequencies below 120Hz to mono; the EQ Three for filtering the low end; and the EQ Eight for controlling the mid and high frequencies
This first “Dry” chain forms the common basis for all the chains that will subsequently develop in parallel (for example, compression or saturation chains). Managing pre-processing with so many macros allows the base tone to be kept consistent across all subsequent signal branches, ensuring total and consistently musical control.
From Series to Parallel: the real magic begins here
At this stage, if you’ve got as far as the EQ and Compressor section, you’ve already got a solid channel strip. But the real power comes to the fore when you discover what happens next: parallel chains. This is where the modern workflow wins over those who’ve spent years behind analogue consoles that didn’t even know what a macro was. Things get a little more complicated, but don’t worry: a sense of humour is your ally on this journey!
Creating the “Parallel” Effect Rack”
Once you’ve finished with the EQ Eight section, you need to create a new Effect Rack containing three parallel chains. Here’s the step-by-step guide:
Insert a Compressor directly into the track, immediately after the EQ Eight you created earlier.
Right-click on the Compressor and select “Group”. Ableton will create a new Effect Rack containing the compressor in a chain. Now manually rename this Effect Rack to “Parallel“, as it will contain all the parallel chains: compressor, overdrive and clean signal.
Rename the internal chain “Compressor” within “Parallel” to ensure order and clarity.
Create a second chain called “Overdrive” still in “Parallel” mode, and add an Overdrive effect.
Create a third chain called “Dry” empty, which carries the signal that has already been processed by the initial serial chain without any further effects.
This system allows the signal to be split into three simultaneous, parallel paths.
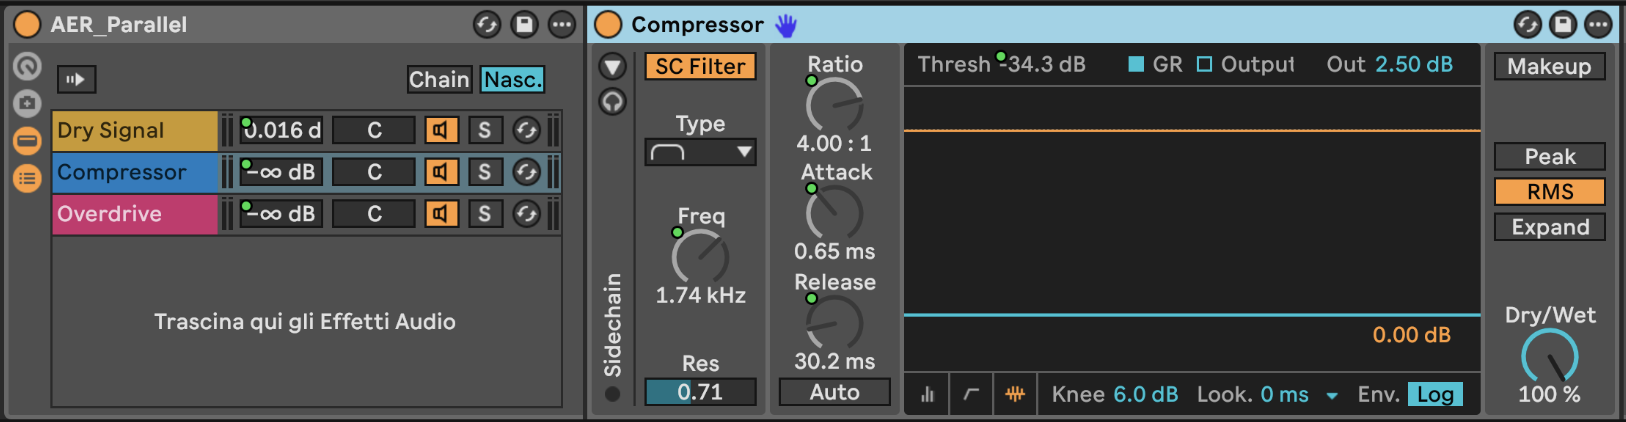
The small green dots indicate which Compressor parameters have been mapped
Macro Assignment in the “Compressor” Chain”
Set the compressor to RMS mode with Wet set to 100%, and enable the Sidechain Filter by setting it to Band Pass. Assign the Threshold, Ratio, Attack, Release and SC EQ Freq macros for a very musical dynamic control.
Macro Assignments in the “Overdrive” Chain”
Set the internal band-pass filter to 4.55, Dynamics to 30%, and Wet to 100%. Assign the Filter Freq, Drive and Tone macros to achieve a controllable, musical, saturated sound.
“Dry” Chain”
The ‘Dry’ chain does not require any macros; it serves as a clean reference to be mixed with the other two.
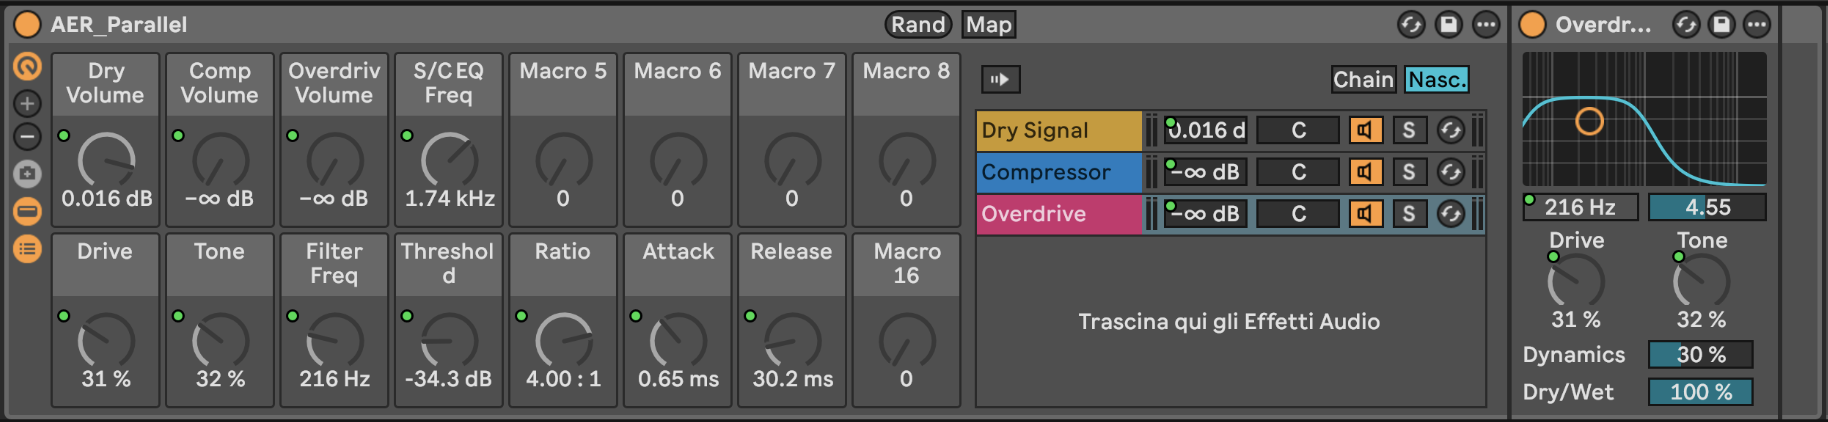
Creating the “Control” Rack”
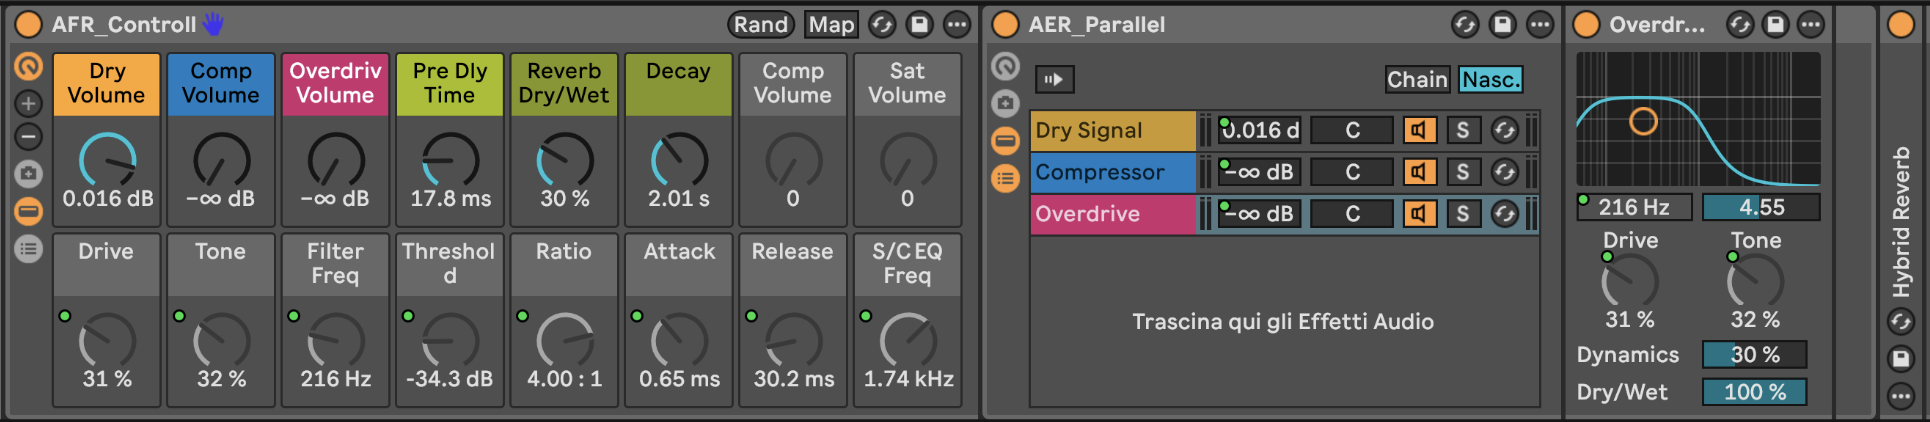
Check – Macro detail and Matryoshka structure
After the Parallel Rack, create a new summing and control Effect Rack that includes the external reverb. Group Parallel and Reverb and rename this rack “Control“.
Assign macros to the parallel chain channels to control Dry, Compressor and Overdrive, and add macros for the reverb parameters (Dry/Wet, Decay, Pre-Delay).
The Final Matryoshka: Channel Strip
Finally, group together the initial serial chain (Utility, EQ Three, EQ Eight) and the “Control“, renaming this final container “Channel Strip“.

The entire Channel Strip. I recommend reducing the “Controll” rack view so that only the necessary parameters are displayed.
This will give you full access to all the macros distributed across the various levels, organised in an efficient and functional hierarchical structure.
Example 2: Techno-inspired disharmonic rack
For those who aren’t afraid of creative chaos
Whilst the Channel Strip embodies precision and professional control, this second example is its rebellious alter ego. It is an Effect Rack designed specifically for those who live and breathe techno, for those who know that sometimes creative chaos generates more interesting ideas than perfect order. A single signal chain where, using the Shifter and a handful of clever macros, you can transform drums, synth plucks or leads into completely different sonic creatures, almost unrecognisable from their original form.
The beating heart of the rack is the Shifter
Set straight away to “Freq” mode at the start, you can map as many as six parameters to the macros, creating a controller that seems simple but is capable of generating extraordinary sonic complexity.
Structure and Macro Assignments of the Shifter
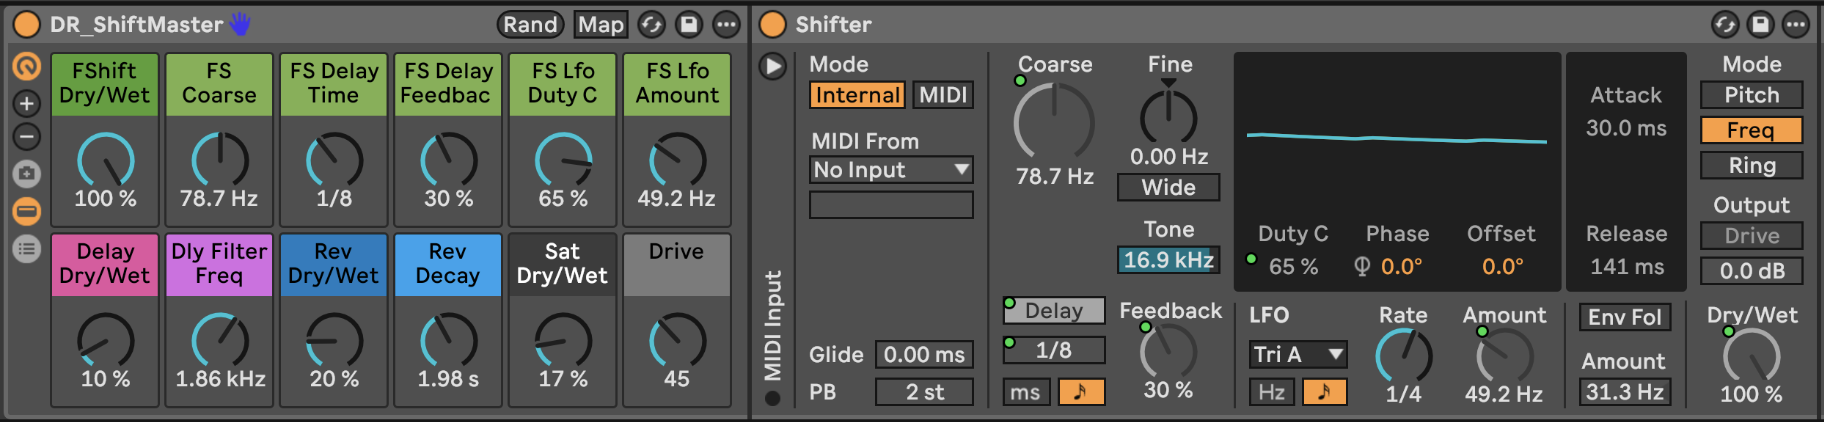
ShiftMaster – the top row of macros in green is entirely dedicated to controlling the Shifter’s parameters, whilst the bottom row is for the FX.
The Shifter contains all the elements needed to create movement, disharmony and controlled chaos. Here’s how to map the parameters:
- Dry/Wet: check how much of the effect is being mixed into the original sound; this is essential for adjusting the effect without overdoing it.
- Coarse: shifts the shifting frequency in large steps, ideal for exploring metallic or “glitch” sounds straight away.
- Delay Time: allows you to choose between different rhythmic subdivisions, perfect for following (or distorting) grooves and patterns. Make sure you set the Shifter to “Sync” mode so that you have access to rhythmic subdivisions synchronised with the project.
- Delay On/Off combined with rhythmic divisions: here’s the magic trick. On the same macro where you map the rhythmic divisions, you also assign the delay’s on/off control. In Ableton’s MAP mode, select “Delay On” and “Delay Time”, and link them to the same macro: you can now go to the macro browser, right-click on the two mapped parameters and set the min/max values. Set Min=1, Max=127 for the delay activation: this way, as soon as the macro value exceeds 1, it switches the delay on, whilst the rest of its range controls the rhythmic beats!
- Feedback: determines how much of the Shifter’s delay signal is fed back into the loop and builds up. This is where the controlled chaos begins.
- Duty C (internal LFO waveform): a macro controls this, along with the LFO’s “Amount” parameter. These two parameters allow you to shape, “darken” or ‘lighten’ the feedback, making it more or less sharp, almost as if to simulate a truly intuitive tilt effect.
The Support Chain
Once the Shifter has carried out its disharmonic processing, the signal passes through:
- Delay (with a dedicated feedback macro): here, you have complete control, even though the situation can spiral out of control.
- Reverb: a macro dedicated to controlling the decay, so you can choose whether to leave a long, atmospheric tail or cut it off instantly.
- Saturator: this macro has a dual function; it adjusts Drive (the amount of saturation) and Output (the signal level) in opposite directions: if you push it, the output automatically decreases, so you don’t risk sudden, massive spikes in volume.
- Limiter After all, you don’t want to end up with a red, screaming master.

Conclusions: when technology meets creativity
When building an Effect Rack from scratch, you often find yourself asking: “How do I organise the effects?” and we have certainly discovered that the answer is far more extensive and fascinating than we could ever have imagined. Effect racks aren’t just tidy storage units: they’re tools that replicate the behaviour of a professional studio mixing desk, with the flexibility and versatility that only software can offer, whilst at the same time acting as entirely creative tools capable of transforming sound in completely unpredictable ways.
The Channel Strip you’ve just built represents the “academic” side of your production kit: serious, controlled, professional. It’s the tool you use when you know exactly what you’re looking for and need the utmost precision. On the other hand, the Techno-Oriented Rack represents creative freedom, the courage to get the sound a bit grubby in the name of innovation, the playground where the rules bend in the service of art.
But the real beauty lies in this: you don’t have to choose between the two. You can build dozens of different Effect Racks, each specialised for a particular task, each of which can be saved as a preset and reused in your future projects. Drum bus processing, parallel compression, creative synthesis, sound design – every aspect of music production can benefit from a well-designed Effect Rack.
The key is to realise that these tools grow with you. You’ll start by building them using the templates provided here, then gradually you’ll begin to customise them, discover new combinations and create solutions that tackle your specific mixing and production problems. And one day you’ll find yourself creating Racks so complex and sophisticated that you’ll end up surprising yourself.
Remember: Ableton Live isn’t a limitation – it’s a springboard. The real power lies in your ability to imagine what’s possible, and the Effect Rack is one of your best allies for turning that imagination into sonic reality. So experiment, fail, succeed, and create sonic disasters when necessary – because ultimately, it’s all part of the creative process.
Make your choice. Be Advanced!

Danilo Rispoli — Ableton Certified Trainer since 2010, sound engineer and sound designer.
For over 15 years, I’ve been helping producers, DJs and musicians turn their ideas into productions that sound exactly as they should: vibrant, powerful and full of personality.
I believe that sound should be experienced and explored, not just learnt; that’s why I teach practical methods, effective approaches and targeted techniques, revealing tips, pitfalls and shortcuts that no manual will ever tell you about – whether online or in person.
If you want to improve your workflow, refine every detail of your productions and gain a deep understanding of the structure of sound, make your choice: Be Advanced!
Ableton Live – Certified Trainers
Superproof
Linkedin
Social
Instagram
SoundCloud
Facebook
 Italian
  English
  French
  Spanish
  German
Leave a Reply
Want to join the discussion?Feel free to contribute!